For the player of Irish traditional music on the flute, the recent history, at least since the early 1970s has been dominated by the issue of the suitability of historic instruments in playing this music, and as a corollary, the development of the “Irish Flute” since that period. *
The history of the flute as an instrument used in Irish traditional music is comparatively short, and, it has been argued, entered the fray via military fife bands, initially as local fife bands sometimes associated with social and political movements such as the temperance movement from the late 1830s, and later the Land League.
Although it’s difficult to say whether concert pitch flutes were used to play Irish dance music at an earlier period, it would seem likely that, given the very widespread popularity of the flute in society as a whole, that it was used to some extent. It’s not until we have hard evidence in the form of photographs that we can really say anything about the flutes that traditional players were using, and this moves the goal posts to the early years of the 20th century.
There are not many such photographs, but so far without exception they show players with what are known in Ireland as “German flutes”, not to be confused with the earlier general English language use of the term to mean manifestations of the simple system flute in Western music as in the various collections of music published as “arranged for the Violin, German flute and hautboy
These flutes were generally produced in areas of eastern Germany and what is now Czechia, such as Saxony and Bohemia, and also in considerable quantity in America. The use of the term German flute, is in the last few years being replaced by “Nach Meyer” (in the style of Meyer) after one of the most prolific, and better, makers of this sort of flute.
They can be characterised as simple system flutes, usually but not exclusively in African blackwood, with eight or occasionally more nickel silver keys mounted between posts screwed directly into the body of the flute. They were factory produced instruments, and were not expensive, and I believe this is one of the factors, combined with a high rate of Irish emigration to the U.S. that lead to their popularity among Irish players. Move forward fifty years, and there is quite a radical change in the type of flute that Irish players were playing or aspiring to play. When I began to play in the early 1970s most accomplished players were using English eight keyed flutes, and Rudall & Rose were already being mooted as among the better makers. Again to some extent, patterns of Irish emigration, which in the years of the Second World War and afterwards had switched largely from the the US to the UK, are an important factor.
It’s necessary at this point to take a detour into the divergent history of pitch in England in contrast to continental Europe. Without getting bogged down in detail, and perhaps a little simplistically, English flute design moves towards wider bores, larger finger holes, and sharper pitch, so that by mid 19th c. A is around 450hz. In continental Europe, bores remain much as they were, finger holes smaller and more evenly sized, and A is around 430hz., and the German flutes that we see in the hands of early 20th c. Irish players are very much part of that tradition.
So what inspired Irish players to move away from German and towards English flutes, especially given that the continental instruments were closer, in many cases much closer, in pitch to A440, that was now the standard? In essence they were choosing instruments whose ideal pitch was considerably above 440, and whose scale, to be in tune, relied on key vented fingerings with which Irish players weren’t familiar.
The answer I think, lies almost entirely in the aesthetics of tone as perceived by Irish players, combined with the increasing availability of English 8 keyed flutes. Most players, previously used to a small-holed, narrow bored German flute, presented with a typical large-holed larger-bored English flute, would immediately find an instrument that was louder, more responsive, and with a more intense tone. The fact that in order to be playable at 440, the tuning slide had to be extended a long way, did not initially prevent players from gravitating to these instruments in large numbers. Indeed I had this experience myself, when a move from an anonymous German flute to a very fine English eight key by Jordan Wainwright flung open the doors of technical advancement at a time when I was in a rut. (See this post.)
Which brings me to the tuning slide.
With all wind instruments, the length of the vibrating air column, the bore in common parlance, determines the pitch. The longer the bore, the lower the pitch. At least from the end of the middle ages in Europe, urban centres, certainly those where patronage whether by the church or aristocracy was active, tended to have their own ideas about pitch, and as communications improved musicians moving from place to place found they needed the ability to play at different pitches. Different instruments achieved this in different ways, but flutes, oboes, and to some extent bassoons, used a system of corps de rechange, essentially extra joints of different lengths which shortened or lengthened the bore and hence sharpened or flattened the pitch of the instrument. Many top end flutes from the early 18th c. had up to six upper middle joints giving a range of pitches. These corps de rechange differed in not only being different lengths, but had the finger holes in different positions for each length/pitch.
Towards the end of the century, this system began to be replaced by the tuning slide, which by changing the length of the head also changed the length of the bore and hence the pitch. It might seem that this was a much simpler way of achieving the same thing, but it wasn’t, and here’s why.
A tuning slide can work very well when the adjustment is small, say up to 5mm (which is why it works well on modern Böhm flutes which are required to play over a very restricted pitch range). More than that, and the problems begin to appear, which are entirely due the fact that moving the slide does not affect all the notes equally.
Think about it...
Let's say the slide is in the closed position, and the distance to the D hole ( that closed by the C# foot key) is 496mm.The distance to the C# hole ( playing all fingers off) is 215.5mm. Opening the slide by 10mm obviously increases both those distances by 10mm, but looked at as a percentage, pulling out the slide 10mm from closed increases the length to the D by 2%, but the length to the B by more than double that, 4.65%. This is fairly close to the oft quoted "1mm change in slide position changes pitch by 1Hz"
The point I'm trying to arrive at here, is that the tuning slide is a really, really poor way of changing the pitch of a simple system cone bore flute over more than a few Hz. With Böhm flutes, its apparent that they were made to play over a much more restricted range of pitch, so moving the slide 1-2mm is actually an effective way of tuning without overly affecting the scale. The introduction of the Patent Head in 1832, by Rudall & Rose, was an attempt to improve the scale when the slide was extended over a large distance. The mechanism allowed the head cork to be moved to a (theoretically) different correct position for each extension of the slide, which indeed improved the tuning of the octaves, but did little to correct the issues of proportionality outlined above.
If we look at the development of the flute during and after the Böhm revolution, one of the interesting responses was from the advocates and makers of the old simple system, who began to modify it in terms of trying to match the tone, volume and tuning of the new design. A good example would be the flutes produced by Abel Sicama, and made by the London maker John Hudson. This addressed some of the more egregious tuning issues, by moving the holes for A and E ( R3 and L3) further down the tube, enlarging them, and controlling them by an open standing key operated by the same fingers, as the new positions and sizes made them unusable without this. This solution went some way to addressing the issues, but although it was taken up by some well-known professional players, notably Sydney Pratten, it eventually morphed into the “Pratten’s Perfected”, essentially the same instrument without the keys for G and D.
It’s essential to realise that the major resistance to the introduction of the Böhm flute, both in England and the continent, was based on the fact that the fingering of the new flute was radically different, and many attempts were made to produce flutes using Böhm’s principles of large equally sized holes in a cylindrical body with tapered head, but which played with a fingering system as close to the simple system as possible. From the Irish player’s point of view, this led to flutes with even larger bores and finger holes, which suited the style of playing that was developing with the revival, the best known being the aforementioned Pratten’s Perfected.
The point I’m trying to make here is that the new cylinder bore flutes, as might be expected, were built to local pitch standards, higher in Britain, lower in continental Europe, but although equipped with a tuning slide, given the nature of the design, this would only work over a very limited range. As far as I can see, this implies that simple system flutes from this period ( the change to Böhm system didn’t happen overnight) were being played at the same pitch, in the case of English 8 keyed, high pitch, despite having a longer tuning slide that ostensibly allowed them to play at a much lower pitch. Why would players of the old system play at a different pitch from players of the new system? ( there is an argument that suggests that they were playing different music which I might follow up at another stage.) I think this only reinforces the argument that English eight keyed flutes were never intended to play as low as 440. Yes, it’s true that a skilful player using a particular embouchure, can play such flutes at 440, but back in the day who would they be playing with since presumably everyone else was playing at a higher pitch? Note that contemporary tutors describe embouchure techniques for these flutes which do not favour flattening the pitch
So backing out of the rabbit hole...and bringing me to why I'm writing this post in the first place.
My first "good" flute, well, the first one I owned, was Rudall Rose & Carte #6318, which I bought from Paul Davies in 1977 or ‘78 for £150. This I played for very many years, even after I was making flutes on my own account. I eventually reluctantly retired it ( from public performance at any rate), for the reasons outlined above, by which stage I was extending the tuning slide by 35mm to get to 440, and I was playing in situations where the internal tuning was causing lots of problems.
Given this, I had of course noticed that with the slide fully closed this flute played almost in Eb, and in fact I made several Eb flutes based on a slight contraction of its dimensions, which were very successful. ( Ireland in the 80s saw a huge craze for playing in Eb) Note I said almost in Eb, for even with the slide fully closed it was still about 10 cents flat.
A couple of years ago, I bought Rudall Carte & Co. 7183, which was added to the pile of flutes waiting to be restored. I had of course roughly made it playable when it arrived, but it was quite disappointing in terms of tone and response, which I put down to some minor leak that wasn't initially obvious. One thing I did notice, though, was that it was very sharp in pitch, playing only slightly flat of Eb with the slide fully closed. Looking at the flute again, I felt that perhaps someone had tried to shorten the head to bring the pitch up.
I began to wonder was there a possibility of modifying this flute to a true Eb pitch.
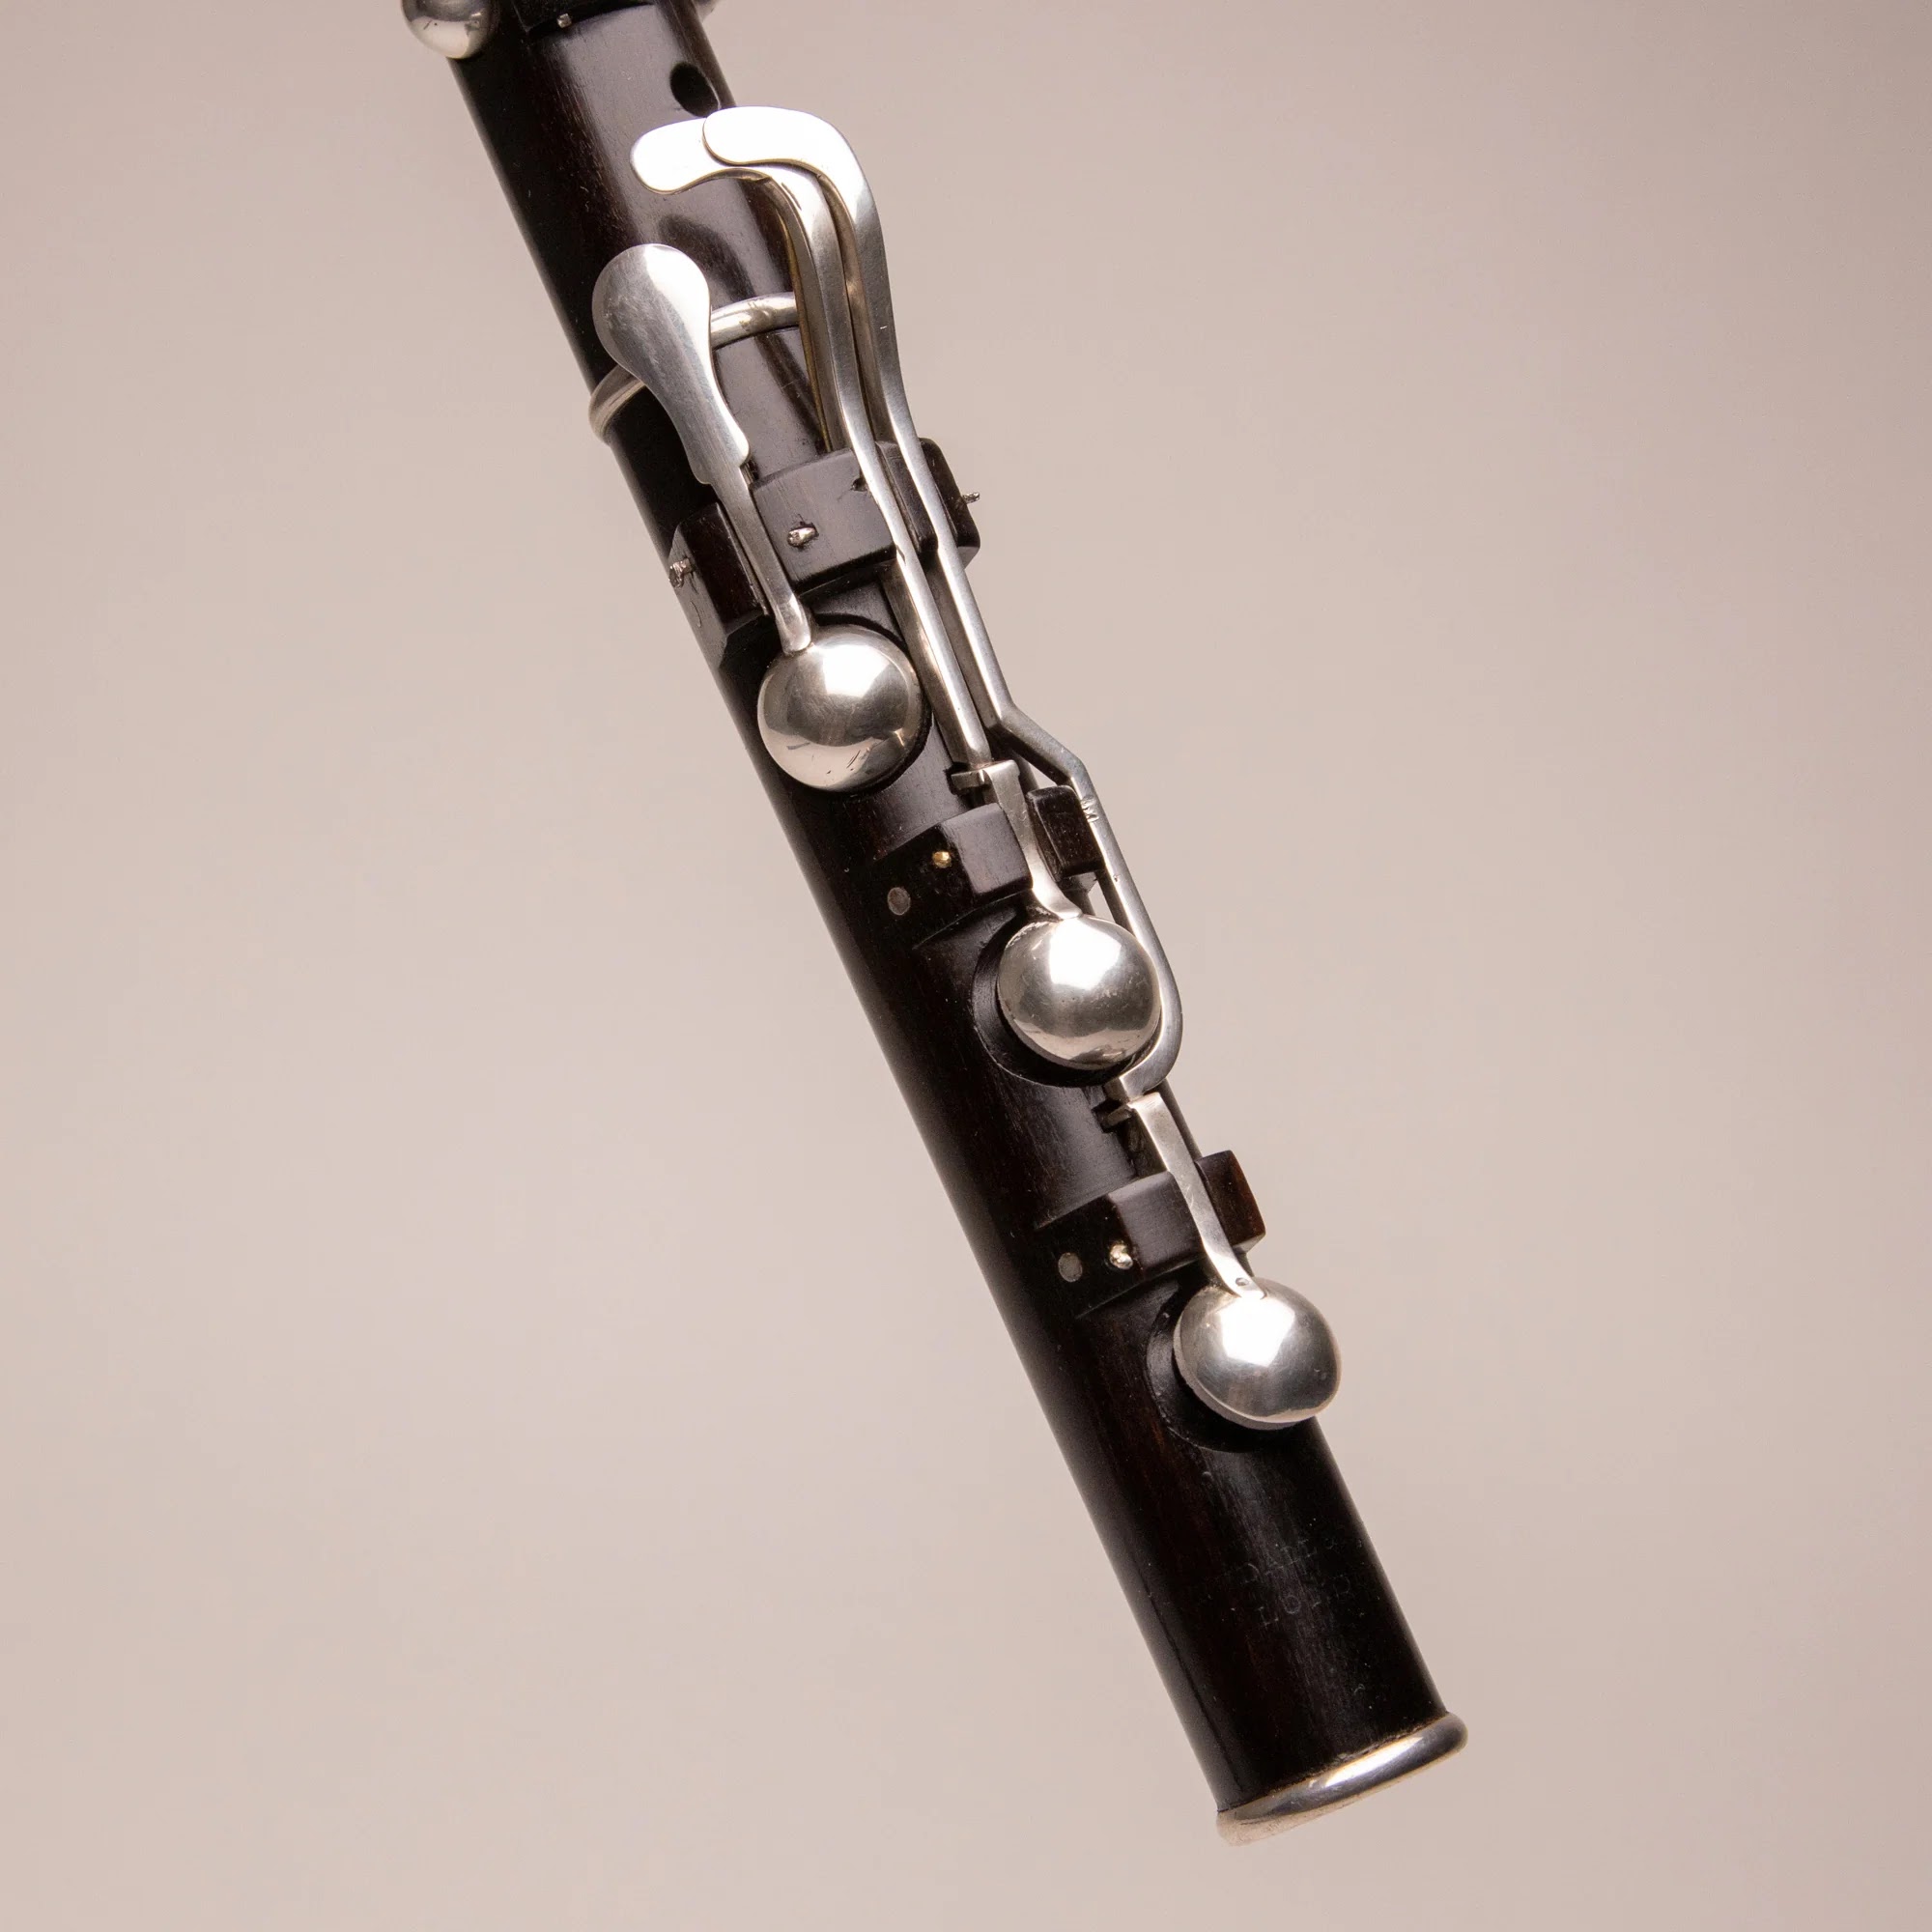
The flute itself was actually in very good condition. There was a crack in the barrel, and the barrel liner was excessively loose, so much so that someone had taken it out, and wrapped thread around it to try and secure it in place. Standard repair here, liner taken out, crack clamped closed, liner refitted and glued in place. Otherwise, joints and pads, a new head cork, and a replacement "knob" on the end of the screw cork mechanism, and I was all done. Most unusually, although apparently a cocus wood instrument, 7183 is in fact in Platymiscium...apart from the foot, which is cocus. ( see my post on FHC 16/01/26) on this point)
What I was left with was a very fine Rudall Carte & Co. flute, which to be brutally honest was of little use to a modern player for music of any type.

As discussed above, pitch and scale are the sole reasons for this. The flute plays beautifully with the fine tone and response that would be expected from top end makers.
So after careful consideration, I decided to convert the flute to a different pitch, and given that, from the trad player's point of view it's much closer to Eb than D, that's where I headed.
Of course it's not simply a matter of raising the pitch by shortening the tube. although that is an important aspect and in fact the starting point. But shorten it to what pitch centre? The most practical place to shorten the bore is in the head, and as we've seen this will affect the pitch of the upper notes to a greater extent than the lower. Given that Irish music is largely in the keys of D and G, their relative minors, and modal forms, I've always tuned to G rather than A, and with old flutes this makes even more sense in that the A tends to be one of the sharper notes in the scale.
So first move was to shorten the head at the tuning slide, taking off the ring, and replacing it when enough had been removed. Here's a comparison between the shortened head and that of #7103. (7103 on the bottom)

The difference in the distance from the end of the barrel/top of the body to the embouchure centre is 3.5mm
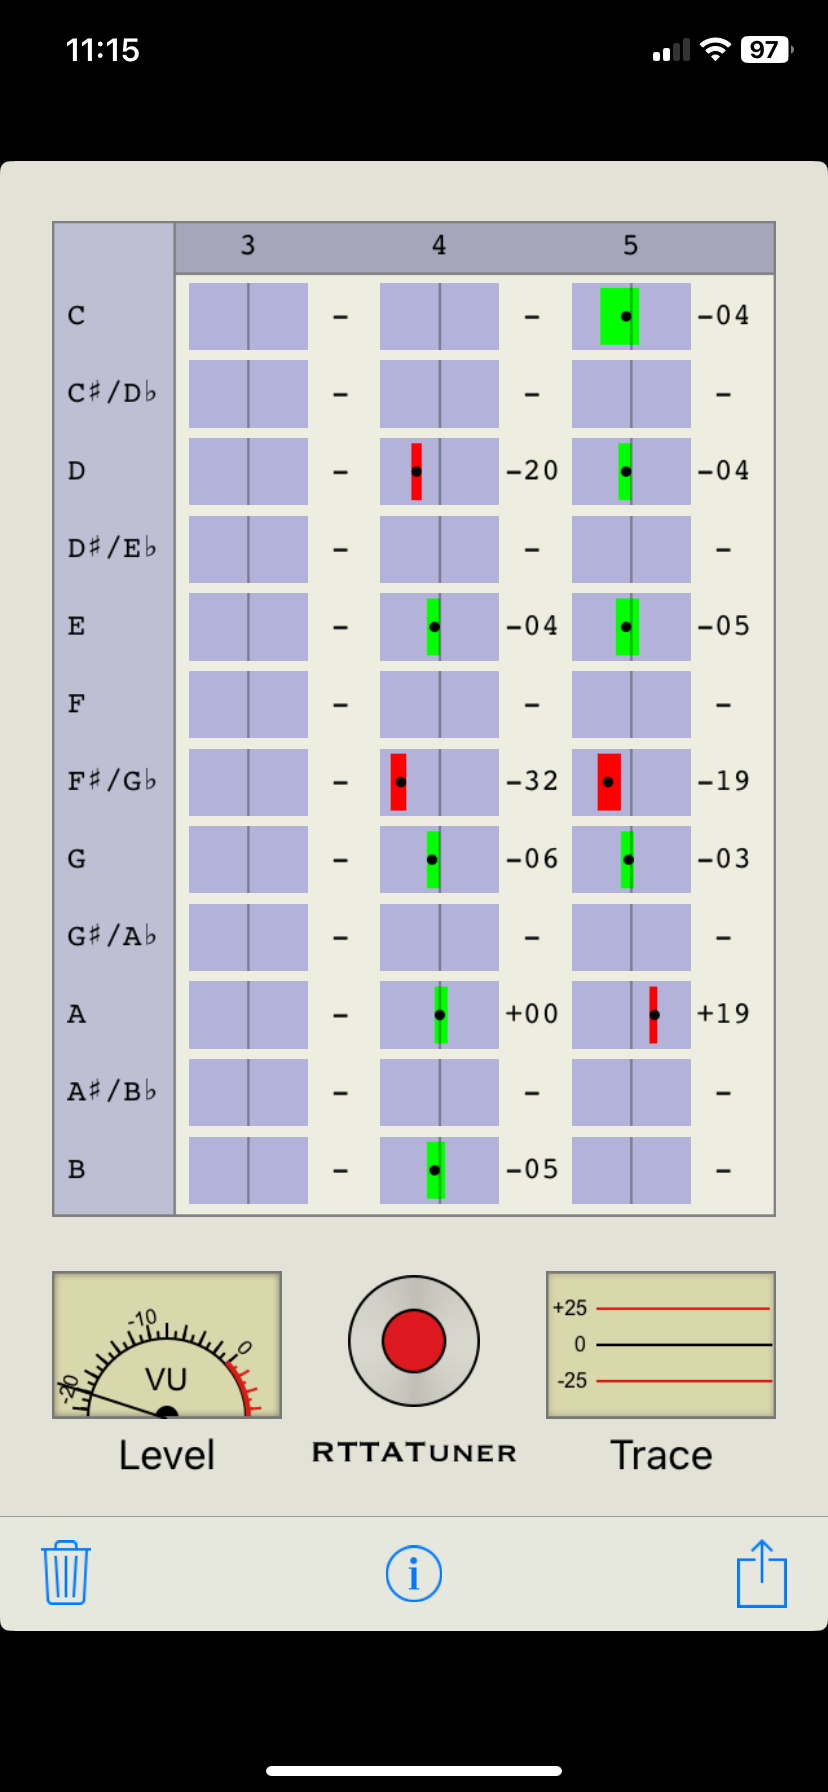
I aimed for a G ( in reality a G#) with the tuning slide extended by about 5 mm. That achieved, the scale had to be addressed, and it must pointed out here that we're aiming at a scale which will be in tune when played with sequential or "whistle fingering", not using any key venting which would give a much more in tune scale, and to be fair was the way these flutes were intended to be played. For the trad player using whistle fingering the scale has standardly the following features (Assuming the G is tuned to the sought pitch centre). What you'll find is: a flat bottom end, from the trad players perspective the D and F# being the worst notes, the G is in tune, and the A and B are sharp.
So how can this be corrected? The pitch that a fingerhole gives when opened depends on two factors...its size, and its position on the tube, and so since moving the holes is a possible but not practical option, changing their size is what's left.
The move to new "Irish Flutes" beginning in the 1980s and now just about complete, has completely changed the market for old simple system flutes in that demand from trad players for such instruments has essentially collapsed. Top end old flutes were changing hands for up to £6000 (about an eye watering €17,000 in today's money). Nowadays the interest from trad players for old flutes is still there but at a severely reduced, almost curiosity level, and quality instruments (pre-restoration) can be had for in the region of £2000 stg. As a consequence of this, there is a considerable quantity of good old flutes, which are no longer being played, because being pitched somewhere between D and Eb they can play in neither.
Hence the decision to attempt a conversion of Rudall Carte & Co. #7183, made in 1897, to an instrument that played at Eb pitch with a good internal scale. As I said, I suspect that the head of this flute may already have been shortened slightly, so I won't quote its sounding length, but that of R,C & Co. # 6989 from about 10 years earlier, which is 565.5mm, exactly as is #7103, so I think it's safe to assume that #7183 was also 565.5. Compare this with R & R # 3701 from around 1837 which has a sounding length of 578.5mm, and with R & R #1376 (made 1830) with s.l. a huge 578.5!
So Eb seemed to be a more achievable target.
In general, and perhaps simplistically, the scale of the English 19th c. simple system flute can be looked at as having a flat right hand, and a sharp left hand, so it's a question of either making the holes on the left hand smaller, or those on the right hand bigger. Neither is in fact ideal, making small holes smaller reduces the volume and tone, and making big holes bigger makes them harder to control. Doing either may affect the tonal/volume balance between the hands.
I went with the big holes bigger approach.
I should point out here that of course all the holes can't be easily made larger. In the case of the flat D, this would entail removing the strike plate of the C# hole, enlarging it, and making a new strike plate and pewter. Doable, but hardly practical, and in many cases the size of this hole approaches the bore diameter, zsi it can't be enlarged. In this case, I addressed the flat D (and in fact C# and D) by judiciously shortening the right hand joint and tenon from 115mm to 113.5mm. I stress judiciously, since I'm sure I'm not the first person to discover that over-shortening the right hand joint can bring the C# and C touches so close to R3 as to not only make them unusable, but to radically interfere with the action of R3. Even at 1.5 mm I had to trim a little off the top edge of the C #and C touches to make the R3 action comfortable.